Update the Firmware via Recovery Image
Installation instructions from version 4.0.0 upwards for firmware updates of the SMS Gateway.
ê A new license managment got released with firmware version 3.0. Immediately after the installation it is not possible to send SMS before uploading the appropriate license file. Pay attention to the loss of all configuration data during a software update with the recovery image.
i If you don't know how to access the webinterface, you'll find an explanation on how to determine the IP-adress of the gateway here.
You then have to put the IP into the URL of your browser to access the webinterface.
Securable Data
❕ Necessary:
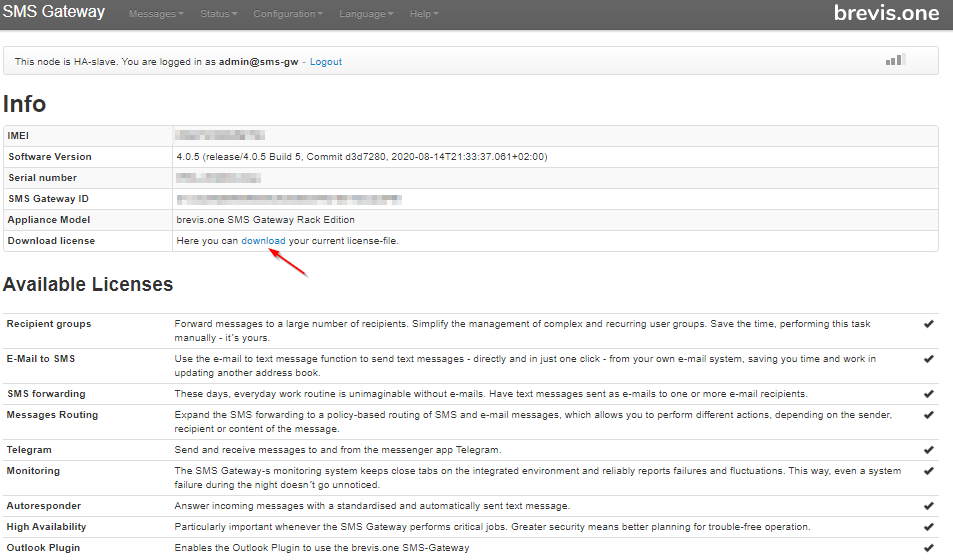
Download your current license file from the web interface ( under Help => Info ) of the SMS Gateway (from Version 3.0.5 on).
i Additional:
You can backup the following data for versions after 3.1.1:
- Import and Export of the addressbook.
- Import and Export of the configuration for the modul Monitoring.
From Version 4 on:
1. Create a bootable USB Stick with Rufus
i To download the Software you need your SMS Gateway serial number. The serial number is located on the SMS Gateway and starts with "GWX-xxxxxx", “DX1-xxxxxx” or “RX2-xxxxxx”(Where can I find the serial number of my SMS Gateway?).
1.1. First download the recovery image from my.brevis.one.
1.2. To create the USB Stic, download and install the Software “Rufus” https://rufus.ie/en/.
êIMPORTANT: Use a 2.0 USB stick. 3.0 may cause errors.
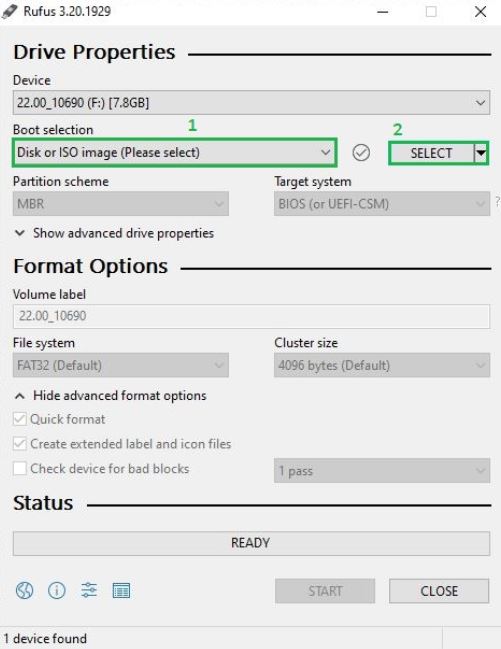
1.3. Start Rufus, klick on SELECT (2) and select the downloaded recovery image file from your computer.
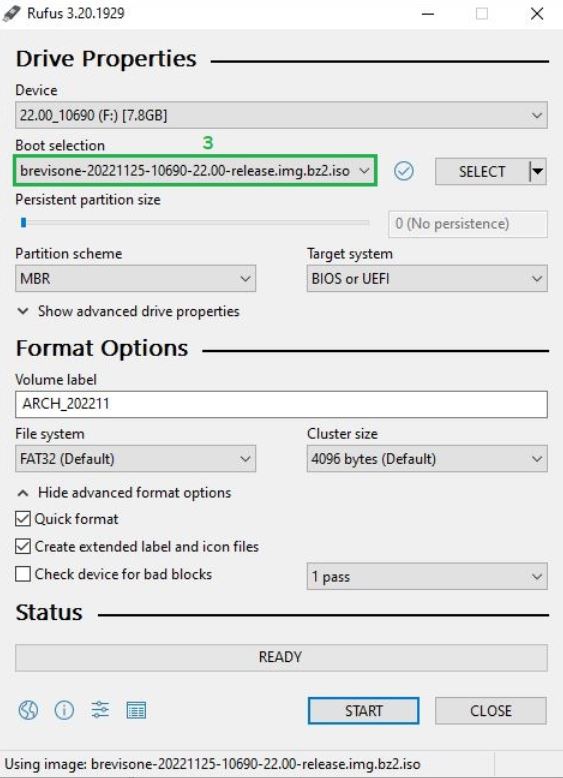
1.4. The selected recovery image is displayed under Startup type (3). Click on START.
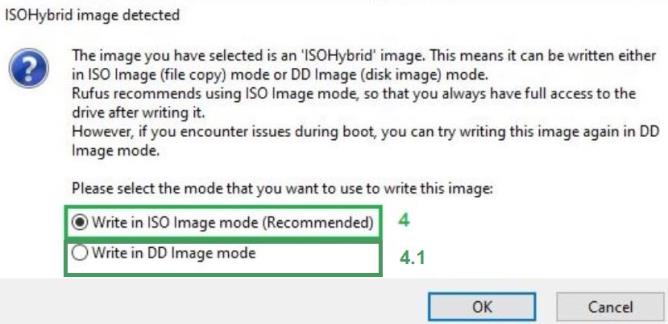
1.5. Select the recommended Write in ISO image mode (4) and click OK.
NOTE: For Version 22.03 and higher, we recommend Write in DD mode (4.1)!
 –
–
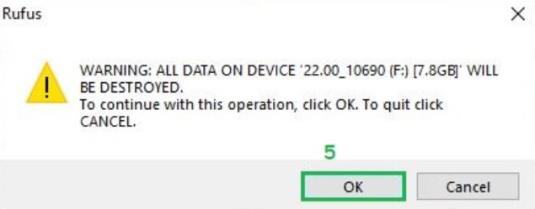
1.6. Confirm the next note with OK (5).
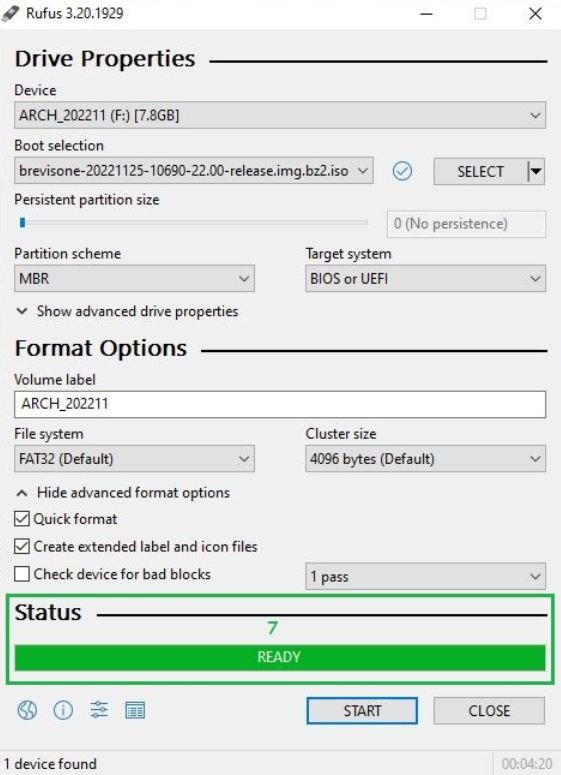
1.7. A bootable USB stick is then created, see Status Ready (7).
2. Preparing the SMS Gateway
❕ Before updating always backup your configuration!
2.1. Turn on the SMS Gateway.
2.2. Connect to the Gateway via the webinterface (only for Desktop Editions).
2.3 Connect the USB stick to a USB port on the Gateway.
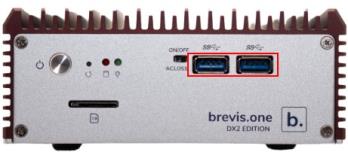
2.3.1. Bootable USB ports of the Desktop Extended Edition (DX2):
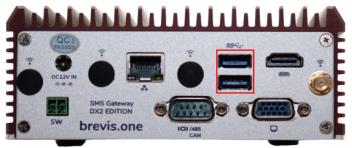
2.3.2. Bootable USB ports of the Desktop Extended Edition (DX):

2.3.3. Bootable USB ports of the Desktop Edition:
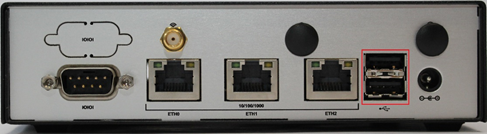
2.3.4. Bootable USB ports of the Rack Extended Edition (RX2):

2.3.5. Bootable USB ports of the Rack Edition:

3. Install the Recovery Image on the SMS Gateway
❕ Before updating always backup your configuration!
3.1. Desktop Edition (DX2)
ê It is possible that after the installation the IP of your SMS Gateway changes. This can be bypassed by setting your DHCP server to assign a static IP to your Gateway.
Even if the IP changes, you can easily find the new IP following the explanation here.
❕We recommend establishing a connection to the gateway using a VGA or HDMI cable and observing the update process and intervening if necessary. You can also connect a standard USB keyboard.
3.1.1 Shut down the SMS gateway via the web interface: Configuration -> Restart/Shutdown -> Shutdown. Alternatively: Press and hold the power button until the gateway switches off.
3.1.2. The gateway should now no longer be accessible via the web interface. If it has been shut down correctly the PWR LED should remain switched off.
3.1.3. Insert the USB stick into one of the USB ports.
3.1.3. Turn on the gateway.
3.1.4. The installation is automatic and takes about 15-20 minutes.
3.1.5. After successful installation, the gateway switches off.
3.1.6. Remove the stick from the USB port.
3.1.7. Turn on the gateway.
3.1.8. The gateway will reboot twice. After the second restart, the console can be used via the console port and PuTTY or via the VGA and/or HDMI port incl. USB keyboard.
3.2. Desktop (DX1) and Rack (RX2) Editions
ê It is possible that after the installation the IP of your SMS Gateway changes. This can be bypassed by setting your DHCP server to assign a static IP to your Gateway.
Even if the IP changes, you can easily find the new IP following the explanation here.
i If you want see the progress of the ongoing update, connect to the serial console, explained here. During the update you will get status information through the output of the console.
❕ We recommend connecting to the gateway using a console cable and observing the update process and intervening if necessary.
3.2.1. Reboot the SMS Gateway via the webinterface: Configuration → Reboot/Shutdown → Reboot.
3.2.2. The Gateway should now be inaccessible via the webinterface and the power LED should turn off and on again.
3.2.3. The installation now starts automatically. If not, you can enter the BIOS via the console when the gateway has been restarted using F10/DEL and adjust the BOOT order.
3.2.4. The Installation procedure takes approximately 30 minutes. We recommend not to fall below this recommendation. Monitor the update progress using the console.
3.2.5. After successfully installing the recovery image, the IP address can be determined in the following way: How do i find the IP adress of my SMS Gateway?
3.3. Special instructions for the Desktop Edition(GWS):
To upgrade your gateway (GWS Desktop Edition) to version 22.00 and higher, you must do the following:
3.3.1. Download the latest 22 version from my.brevis.one (ignore warning). The login data is your serial number and IMEI of the gateway.
3.3.2. Create a boot stick according to the instructions on this page under “1. Create a bootable USB Stick with Rufus”
3.3.3. Save your license. You can find it under " Help > Info".
3.3.4. Backup your address book.
❕ Configuration files can only be imported with the SAME firmware version. Say 22.03 to 22.03
3.3.5. Disconnect your gateway from power.
3.3.6. Connect the console cable.
3.3.7. Open a connection to the console of the gateway, e.g. via PuTTY.
3.3.8. Plug in the USB stick with the latest firmware.
3.3.9. Connect the gateway to the power.
3.3.10. Now look into the console window. Press F10 as soon as it can be read to get into the boot sequence.
3.3.11. Select the boot stick and press Enter.
3.3.12. A Linux selection screen will be displayed. This will run through automatically. If not, leave the first option selected and press Enter.
3.3.13. The installation will take some time about 30-40 minutes.
❕ Starting the installation may also take time. Do not switch off the gateway!
3.3.14. As soon as "Restart / Reboot" appears in the console window, the installation is complete.- Disconnect the gateway from the power supply.
3.3.15. Remove the boot stick.
3.3.16. Connect the gateway to the power.
3.3.17. Once the console window appears, it will take a few more minutes for this to respond to input!
3.3.18. If this still does not respond to any input after 10 minutes, disconnect the gateway from power and wait a few minutes before reconnecting it.
3.3.19. Establish a connection, using the IP of the gateway, and import your license file.
3.3.20. The address book can be imported.
Please note that the hardware performance of the GWS Gateway does not meet the optimal requirements for the current firmware. Accordingly, the response times are slower. Please take this into account.
3.4. Rack (GWL) Editions
ê It is possible that after the installation the IP of your SMS Gateway changes. This can be bypassed by setting your DHCP server to assign a static IP to your Gateway.
Even if the IP changes, you can easily find the new IP following the explanation here.
i If you want to install the update, please connect a VGA cable to the gateway and connect it to a monitor. Afterwards, use one of the two bootable USB ports for a USB keyboard as shown in figure 2.3.4.
Please insert the boot stick (USB 2.0) into the other USB port.
3.4.1. Reboot the SMS Gateway by pressing the On/Off button for approximately 5 seconds until the power LED turns off.
3.4.2. Turn on the Gateway by pressing the On/Off button one time. The power LED turns on again.
3.4.3. With the GWL edition, you must change the boot order after booting:
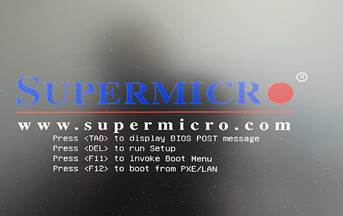 -->> Please press <F11> here
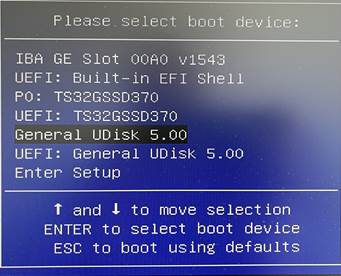 -->> After that please select the USB stick (here e.g.: General UDisk 5.00)
3.4.4. The Gateway should now be inaccessible via the webinterface.
3.4.5. The Installation now starts automatically.
3.4.6. The Installation procedure takes approximately 30 minutes. We recommend not to fall below this recommendation.
3.4.7. After successfully installing the recovery image, the IP address can be determined in the following way: How do i find the IP adress of my SMS Gateway?
4. Finishing the installation
ê After completing the installation it is not possible to access the webinterface via HTTP anymore. The access is now done via HTTPS and could potentially lead to the following message: "This is not a safe connection". Further details you will find here:
4.1. Disconnect the Gateway from power after waiting for the recommended time.
4.2. Disconnect the USB stick.
4.3. Power up the SMS Gateway. The gateway can reboot itself up to 2 times before it is fully functional. No configurations should be made during this time.
4.4. If the webinterface is not accessible at this point, the IP has changed. To regain access you have to reobtain the IP of the Gateway (How do i find the IP adress of my SMS Gateway?).
4.5. The default login data is as follows: user: admin password: admin
Related articles